Access Token and Refresh Token: A Simple Guide with Code Examples

1. Introduction
When I started learning backend development, I came across a question: how does a website remember that a user is logged in?
For example, imagine that I log in to an e-commerce website. After logging in, I can visit my profile, see my cart, and place an order. I do not need to enter my email and password on every page.
But how does the backend know that I am already logged in?
This is where Access Tokens and Refresh Tokens come in.
In this article, I will explain both tokens in simple words. I will also use Node.js, Express.js, and JWT to show how they work with code examples.
2. What Is Authentication?
Authentication means checking who a user is.
Imagine that a user enters an email and password on a login page. The backend checks whether the details are correct.
If the details are correct, the backend allows the user to log in.
Here is a simple example:
app.post("/login", async (req, res) => {
  const { email, password } = req.body;
// Find the user in the database
// Compare the password securely // If the credentials are correct,
// create the login session or tokens
});
This is only the basic structure. A real login route must find the user, compare the password with the stored password hash, and handle invalid credentials.
After successful login, the backend can generate tokens for the user.
3. What Is JWT?
JWT stands for JSON Web Token.
It is a common format used to carry information between a client and a server.
A JWT has three parts:
- Header
- Payload
- Signature
A token looks something like this:
xxxxx.yyyyy.zzzzzThe three parts are separated by dots.
The payload can contain information such as a user’s ID and the token’s expiration time.
For example, the decoded payload might look like this:
{
  "id": "user123",
  "iat": 1792000000,
  "exp": 1792000900
}
Here:
ididentifies the user.iatmeans the time when the token was issued.expmeans the time when the token expires.
These timestamps are illustrative.
Important: A signed JWT is not automatically encrypted. Anyone who gets the token may be able to read its payload. Never put passwords or other sensitive information inside it.
4. What Is an Access Token?
An Access Token is used to access protected API routes.
Let’s say I log in to a website. The backend creates an Access Token and sends it to the frontend.
When I want to see my profile, the frontend sends the token with the request.
For example:
GET /api/profile
Authorization: Bearer YOUR_ACCESS_TOKEN
The backend checks the token. If it is valid and the user has permission to access the resource, the backend returns the profile information.
Example: Creating an Access Token
First, install the required packages:
npm install express jsonwebtoken dotenvNow create a simple token:
const jwt = require("jsonwebtoken");const accessToken = jwt.sign(
{ id: "user123" },
process.env.ACCESS_TOKEN_SECRET,
{ expiresIn: "15m" }
);console.log(accessToken);
Let’s understand the code.
jwt.sign()creates a signed JWT.{ id: "user123" }is the payload.ACCESS_TOKEN_SECRETis the secret used to sign the token.expiresIn: "15m"means the token expires after 15 minutes.
The secret should be stored in an environment variable, not written directly in the code.
Example .env file:
ACCESS_TOKEN_SECRET=your_long_random_secretUse a strong, randomly generated secret and never commit your real .env file to GitHub.
5. What Is a Refresh Token?
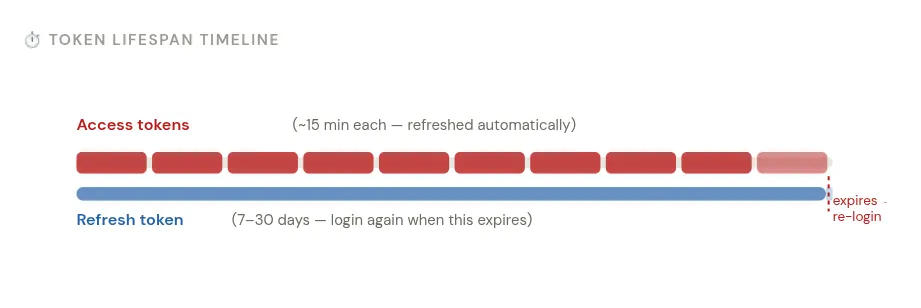
Now imagine that the Access Token expires after 15 minutes.
Does the user need to log in again every 15 minutes?
Not necessarily.
A Refresh Token allows the application to request a new Access Token without asking the user to enter their password again.
A Refresh Token usually has a longer lifetime than an Access Token.
For example:
const accessToken = jwt.sign(
  { id: user._id },
  process.env.ACCESS_TOKEN_SECRET,
  { expiresIn: "15m" }
);
const refreshToken = jwt.sign(
{ id: user._id },
process.env.REFRESH_TOKEN_SECRET,
{ expiresIn: "7d" }
);Here, the Access Token expires after 15 minutes, while the Refresh Token expires after seven days.
These are example values. The correct lifetime depends on the application’s needs.
Notice that I used two different secrets. This makes it easier to manage the two token types separately.
A Refresh Token must also be validated against the application’s session or revocation rules. A valid signature alone does not tell us whether a session has been logged out or revoked.
6. Access Token vs. Refresh Token
Access TokenRefresh TokenUsed to access protected routesUsed to request a new Access TokenUsually has a short lifetimeUsually has a longer lifetimeSent with protected API requestsSent to a dedicated refresh endpointMust be validated by the backendMust be validated and checked against session rulesCan be rejected after expirationCan be rejected after expiration or revocation
The main difference is their purpose.
An Access Token is for accessing resources. A Refresh Token is for renewing access.
7. How Do Both Tokens Work Together?
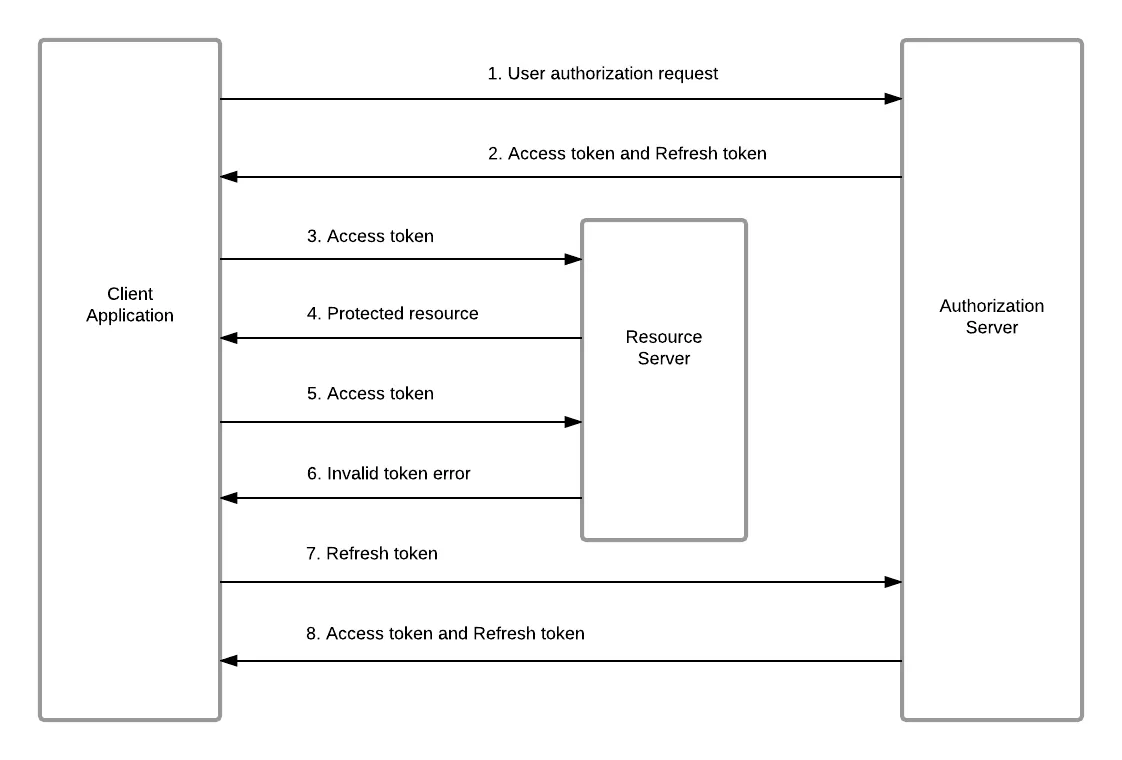
Let’s understand the complete flow.
Step 1: The user logs in
The user sends their email and password to the backend.
POST /api/auth/loginThe backend checks the credentials.
Step 2: The backend creates two tokens
If the login details are correct, the backend creates an Access Token and a Refresh Token.
{
  accessToken: "access_token_here"
}
The Refresh Token can be sent in a protected cookie instead of being included in the JSON response.
Step 3: The frontend calls a protected route
GET /api/profile
Authorization: Bearer access_token_here
The backend verifies the Access Token before returning the requested data.
Step 4: The Access Token expires
After 15 minutes, the Access Token may expire.
If the frontend makes another protected request with that expired token, the backend should reject it.
Step 5: The frontend requests a new token
The frontend calls the refresh endpoint.
POST /api/auth/refreshThe browser sends the Refresh Token cookie if the cookie settings and request conditions allow it.
Step 6: The backend verifies the Refresh Token
If the Refresh Token is valid and the session is still active, the backend issues a new Access Token.
Step 7: The user continues working
The frontend uses the new Access Token for future protected requests.
If the Refresh Token is expired, invalid, or revoked, the user may need to log in again.
8. Creating Tokens in a Separate Function
In a real project, I do not need to write the same token-generation code in every route. I can create a reusable function.
For example, create a file named auth.js:
const jwt = require("jsonwebtoken");function generateTokens(userId) {
const accessToken = jwt.sign(
{ id: userId },
process.env.ACCESS_TOKEN_SECRET,
{ expiresIn: "15m" }
); const refreshToken = jwt.sign(
{ id: userId },
process.env.REFRESH_TOKEN_SECRET,
{ expiresIn: "7d" }
); return {
accessToken,
refreshToken
};
}module.exports = { generateTokens };
Now I can use this function in my login controller:
const { generateTokens } = require("./auth");const tokens = generateTokens(user._id);res.json({
message: "Login successful",
accessToken: tokens.accessToken
});
This example returns the Access Token in JSON. Before using it in production, the controller should also store or register the Refresh Token securely and send it through the chosen secure transport, such as an HTTP-only cookie.
9. Verifying an Access Token
Creating a token is only one part of authentication. The backend also needs to verify it.
Get Imran Mondal’s stories in your inbox
Join Medium for free to get updates from this writer.
Here is a simple Express middleware:
const jwt = require("jsonwebtoken");function verifyAccessToken(req, res, next) {
const authHeader = req.headers.authorization; if (!authHeader || !authHeader.startsWith("Bearer ")) {
return res.status(401).json({
message: "Access token is required"
});
} const token = authHeader.split(" ")[1]; try {
const decoded = jwt.verify(
token,
process.env.ACCESS_TOKEN_SECRET
); req.user = {
userId: decoded.id
}; next();
} catch (error) {
return res.status(401).json({
message: "Invalid or expired access token"
});
}
}module.exports = verifyAccessToken;
Let’s understand the important parts.
req.headers.authorizationreads the Authorization header.startsWith("Bearer ")checks the expected format.jwt.verify()checks the signature and expiration.req.userstores the verified user's ID for later middleware or controllers.next()passes control to the next middleware or route handler.
If the token is invalid, the middleware returns an error instead of allowing the request to continue.
Using the middleware
app.get(
  "/api/profile",
  verifyAccessToken,
  (req, res) => {
    res.json({
      message: "Profile accessed successfully",
      userId: req.user.userId
    });
  }
);
Here, the profile route can only continue if the middleware accepts the token.
10. Storing a Refresh Token in an HTTP-Only Cookie
A Refresh Token is powerful because it can be used to obtain new Access Tokens. That is why it needs careful protection.
One common approach is to store it in an HTTP-only cookie.
First, install cookie-parser:
npm install cookie-parserThen configure Express:
const express = require("express");
const cookieParser = require("cookie-parser");
const app = express();app.use(express.json());
app.use(cookieParser());
After successful login, the backend can set the Refresh Token cookie:
res.cookie("refreshToken", refreshToken, {
  httpOnly: true,
  secure: process.env.NODE_ENV === "production",
  sameSite: "strict",
  path: "/api/auth",
  maxAge: 7 * 24 * 60 * 60 * 1000
});
res.json({
message: "Login successful",
accessToken
});Here is what the cookie options mean:
httpOnly: Client-side JavaScript cannot read the cookie.secure: In production, the cookie is sent only over HTTPS.sameSite: Helps control cross-site cookie sending.path: Limits the URL paths for which the browser sends the cookie.maxAge: Sets the cookie lifetime in milliseconds.
The exact cookie settings depend on the application. If the frontend and backend are on different sites, the cookie and CORS settings may need to change. Cross-site cookies often require SameSite=None; Secure, along with appropriate CSRF protection.
An HTTP-only cookie helps protect against JavaScript reading the token, but it does not protect against every kind of attack.
11. Creating a Refresh Token Route
Now let’s create a refresh endpoint.
The frontend sends a request to /api/auth/refresh. The backend reads the Refresh Token cookie and verifies it.
Here is a simplified example:
app.post("/api/auth/refresh", async (req, res) => {
  const refreshToken = req.cookies.refreshToken;
if (!refreshToken) {
return res.status(401).json({
message: "Refresh token is missing"
});
} try {
const decoded = jwt.verify(
refreshToken,
process.env.REFRESH_TOKEN_SECRET
); // In a real application, check whether the
// user's session or refresh token is still active. const accessToken = jwt.sign(
{ id: decoded.id },
process.env.ACCESS_TOKEN_SECRET,
{ expiresIn: "15m" }
); return res.json({ accessToken });
} catch (error) {
return res.status(401).json({
message: "Invalid or expired refresh token"
});
}
});
This is a teaching example, not a complete production implementation.
A production refresh route should verify that the user still exists, check that the session or Refresh Token has not been revoked, and handle Refresh Token rotation when that strategy is used.
The backend should also consider what happens if a Refresh Token is stolen or reused after rotation.
12. Calling the Refresh Route from the Frontend
The frontend needs to send the refresh request when the Access Token expires.
With Axios, a simple refresh request can look like this:
import axios from "axios";const api = axios.create({
baseURL: "http://localhost:3000/api",
withCredentials: true
});async function refreshAccessToken() {
const response = await api.post("/auth/refresh"); return response.data.accessToken;
}export default api;
The withCredentials: true option allows the browser to include cookies in cross-origin requests when the server's CORS and cookie settings permit it.
The frontend and backend must be configured consistently. For example, when credentials are enabled for cross-origin requests, the backend must allow the exact frontend origin rather than using a wildcard origin.
Sending the Access Token
const accessToken = await refreshAccessToken();const response = await api.get("/profile", {
headers: {
Authorization: `Bearer ${accessToken}`
}
});console.log(response.data);
This demonstrates the basic idea: obtain a valid Access Token and use it to request a protected resource.
A full application can use an Axios interceptor to attach the current Access Token automatically and refresh it when necessary. It should also prevent endless retry loops and handle refresh failures by asking the user to log in again.
13. What Happens When the User Logs Out?
Logging out should end the session, not merely remove the Access Token from the frontend.
For example, the frontend can call:
await api.post("/auth/logout");The backend should revoke or invalidate the active Refresh Token or session and clear the cookie:
res.clearCookie("refreshToken", {
  httpOnly: true,
  secure: process.env.NODE_ENV === "production",
  sameSite: "strict",
  path: "/api/auth"
});
res.json({
message: "Logged out successfully"
});The cookie-clearing options should match the original cookie settings.
Clearing the cookie removes it from the browser, but a copied Refresh Token could still work if the backend does not revoke it. That is why server-side session or token revocation is important.
A short-lived Access Token may remain usable until it expires unless the application has an additional mechanism to revoke it.
14. Common Mistakes I Should Avoid
While learning this topic, I found that understanding the purpose of each token is more important than simply copying the code.
Here are some mistakes to avoid:
1. Using the Refresh Token for normal API requests
The Access Token should be used to access protected routes. The Refresh Token should be used through the refresh endpoint.
2. Making Access Tokens live for too long
A short lifetime can reduce the damage caused by an exposed token.
3. Storing secrets in frontend code
The signing secret belongs on the backend. Anything included in frontend code can be exposed to users.
4. Forgetting to handle expired tokens
The application should have a clear way to handle expired Access Tokens and failed refresh requests.
5. Assuming that a valid JWT always means a valid session
A Refresh Token can be revoked even before its expiration time. The backend must check the application’s session rules.
6. Thinking that JWT payloads are secret
A normal signed JWT is not encrypted. Do not store passwords or private information in its payload.
7. Forgetting CSRF protection when using cookies
Cookies may be sent automatically by the browser. Depending on the application, CSRF protection and correct cookie settings are necessary.
15. What I Learned
The most important thing I learned is that Access Tokens and Refresh Tokens have different responsibilities.
The Access Token helps the backend identify the user making a protected request. The Refresh Token helps the application issue a new Access Token when the old one expires.
I also learned that authentication includes much more than generating tokens. The backend must verify tokens, protect routes, manage cookies, handle expiration, and provide a safe logout process.
As I continue learning Node.js, Express.js, and frontend integration, I want to practice these concepts in a complete project and understand how each part works together.
Conclusion
Access Tokens and Refresh Tokens help developers build authentication systems that balance security and convenience.
The Access Token is used for protected API requests, while the Refresh Token is used to obtain new Access Tokens. When they are implemented with proper validation, secure storage, expiration, and revocation, they can help manage user sessions effectively.
For me, the best way to learn backend development is to understand the reason behind each step, write the code myself, and test what happens when something goes wrong.
I am still learning, and every new concept helps me understand how real-world web applications work.