Database Connection Pooling in Node.js: A Complete Beginner’s Guide

Understanding why every serious Node.js backend needs connection pooling — and how to implement it correctly
If you’ve ever built a Node.js application that talks to a database — PostgreSQL, MySQL, MongoDB, or anything else — you’ve probably typed code like this at some point:
const client = new Client(config);
await client.connect();
const result = await client.query('SELECT * FROM users');
await client.end();
This works fine when you’re building a small script or testing something locally. But the moment your application starts handling real traffic — say, 100 or 1,000 requests per second — this pattern falls apart quickly. Your database starts refusing connections, your application slows to a crawl, and you start seeing errors like too many connections or ECONNREFUSED.
The fix for this problem is called connection pooling, and it’s one of the most important concepts to understand when building production-grade backend applications. This article will walk you through:
- What a database connection actually is, and why creating one is expensive
- What connection pooling is, conceptually, with flow diagrams
- How connection pooling works internally
- How to implement it in Node.js, step by step, with real code
- Best practices, common mistakes, and how to monitor your pool
By the end, you should be able to confidently explain connection pooling to someone else, and implement it correctly in your own projects.
Part 1: What Actually Happens When You “Connect” to a Database?
Before we can understand pooling, we need to understand what a single database connection really is, because the word “connection” hides a surprising amount of work.
When your Node.js application connects to a database like PostgreSQL or MySQL, the following sequence of events happens:
Node.js App                          Database Server
     |                                       |
     |---- 1. TCP Handshake (SYN) --------->|
     |<--- 2. TCP Handshake (SYN-ACK) ------|
     |---- 3. TCP Handshake (ACK) --------->|
     |                                       |
     |---- 4. Authentication Request ------>|
     |<--- 5. Auth Challenge ----------------|
     |---- 6. Credentials Sent ------------>|
     |<--- 7. Auth Success -------------------|
     |                                       |
     |---- 8. Session/Process Allocated ---->|
     |     (DB spins up a backend process    |
     |      or thread just for you)          |
     |                                       |
     |<=== CONNECTION IS NOW "READY" =======>|
     |                                       |
     |---- 9. Query Sent ------------------->|
     |<--- 10. Result Returned --------------|
That’s a lot of steps just to run one query! Here’s why each step matters:
- TCP Handshake (steps 1–3): Establishing a raw network connection between two machines (or two processes) always takes at least one round trip. On cloud infrastructure, this round trip can be several milliseconds — sometimes tens of milliseconds if the database is in a different availability zone.
- Authentication (steps 4–7): The database needs to verify who you are. This usually involves password hashing/verification (like SCRAM-SHA-256 in PostgreSQL), which is deliberately computationally expensive to resist brute-force attacks.
- Session Allocation (step 8): This is the expensive part most people don’t think about. PostgreSQL, for example, forks an entire OS process for every connection. MySQL spins up a new thread. Either way, the database server has to allocate memory, set up internal data structures, and prepare a session — all before your query even runs.
Only after all of this does your actual query (step 9) get executed.
The key insight: Steps 1–8 can easily take 20–100+ milliseconds, while your actual query (step 9–10) might only take 2–5 milliseconds. If you open and close a new connection for every single query, you could be spending 95% of your time on connection setup and only 5% on actual work.
Now imagine 1,000 concurrent users hitting your API. If each request opens a brand-new connection:
- The database has to fork 1,000 new processes/threads almost simultaneously
- Most databases have a hard limit on how many connections they can handle (PostgreSQL defaults to 100!)
- Your database server’s CPU and memory get overwhelmed just managing connection overhead — not even running queries yet
This is precisely the problem connection pooling solves.
Part 2: What Is Connection Pooling?
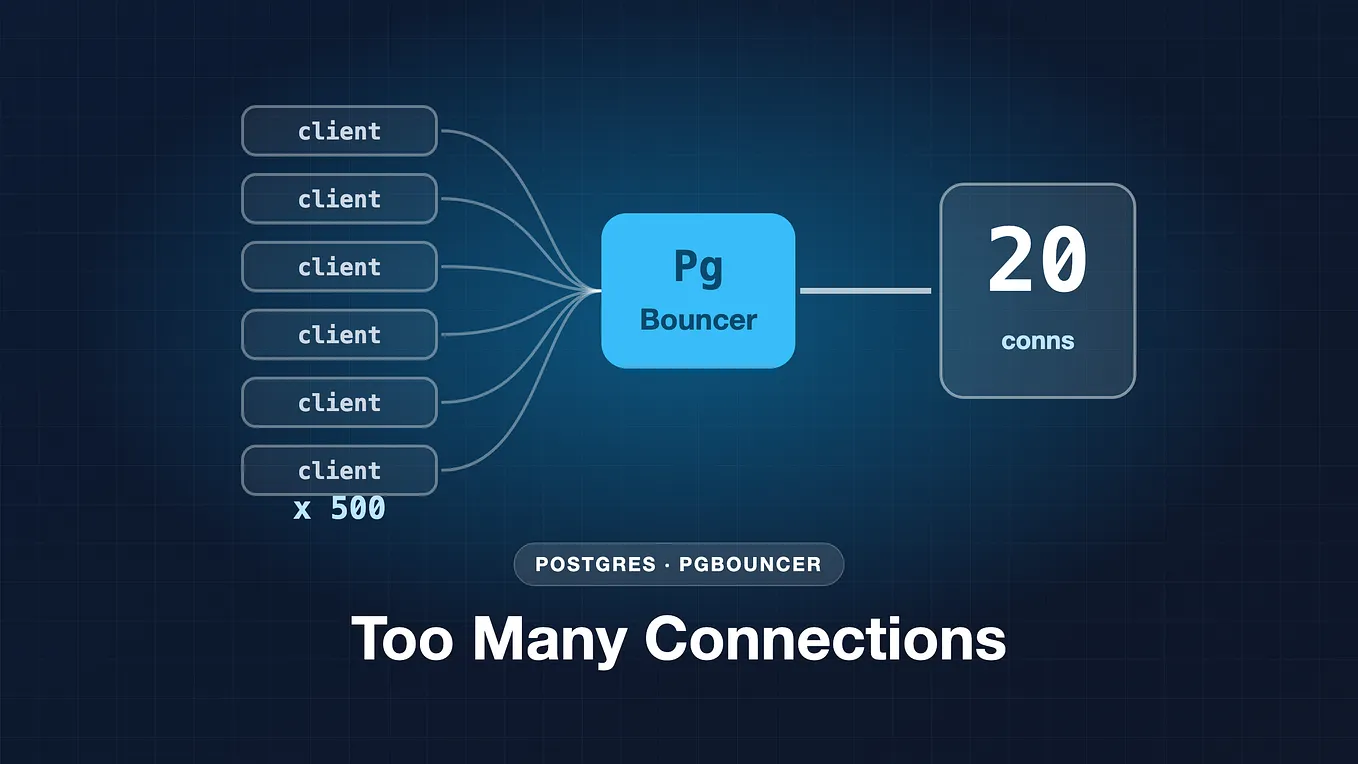
Connection pooling is a technique where, instead of creating a new database connection every time you need one, you maintain a “pool” (a collection) of already-open, reusable connections. When your application needs to run a query, it borrows an existing connection from the pool, uses it, and then returns it to the pool instead of closing it.
Think of it like a taxi stand outside an airport, instead of everyone calling a car manufacturer to build them a brand-new car every time they need a ride.
WITHOUT POOLING                                WITH POOLING
 -----------------                             --------------

Request 1  ---> [New Connection] ---> DB       Request 1 ---\
 Request 2  ---> [New Connection] ---> DB      Request 2 ----\
 Request 3  ---> [New Connection] ---> DB      Request 3 -----> [ POOL ] ---> DB
 Request 4  ---> [New Connection] ---> DB      Request 4 ----/   (5 pre-made
 Request 5  ---> [New Connection] ---> DB      Request 5 ---/    connections,
                                                                  reused constantly)
 Each request pays full connection             Requests share a small set of
 setup cost (TCP + Auth + Session)             already-authenticated, already-open
 EVERY SINGLE TIME.                            connections. Setup cost paid ONCE.
The Pool Lifecycle
Here’s a step-by-step flow diagram of how a connection pool behaves over time:
                       ┌───────────────────────────────┐
                       │   APPLICATION STARTS UP       │
                       └───────────────┬───────────────┘
                                       │
                                       ▼
                     ┌───────────────────────────────────┐
                     │  Pool creates N connections       │
                     │  upfront (e.g., min: 2)           │
                     │  All connections sit "idle"       │
                     └───────────────┬───────────────────┘
                                       │
                                       ▼
       ┌────────────────────────────────────────────────────────────┐
       │                        POOL (idle connections)             │
       │   [Conn 1 - idle]  [Conn 2 - idle]  [Conn 3 - idle]        │
       └────────────────────────────────────────────────────────────┘
                │                    │                   │
     Request A acquires     Request B acquires    (Conn 3 stays idle,
     Conn 1 → "in use"      Conn 2 → "in use"      waiting for work)
                │                    │
                ▼                    ▼
        Query executes        Query executes
                │                    │
                ▼                    ▼
     Conn 1 returned to      Conn 2 returned to
     pool → "idle" again     pool → "idle" again


If ALL connections are busy and a new request comes in:
   ┌──────────────────────────────────────────────────────┐
   │  Request C waits in a QUEUE until a connection       │
   │  is free, OR the pool creates a NEW connection       │
   │  (if current count < max pool size)                  │
   └──────────────────────────────────────────────────────┘
If a connection sits idle too long (idleTimeoutMillis):
   ┌──────────────────────────────────────────────────────┐
   │  Pool closes it automatically to free up resources   │
   │  (as long as pool size stays above the minimum)      │
   └──────────────────────────────────────────────────────┘
Key Terminology

Part 3: Implementing Connection Pooling in Node.js
Now let’s get into actual code. We’ll cover the two most common databases in the Node.js ecosystem: PostgreSQL (using the pg package) and MySQL (using mysql2). Both libraries have pooling built in — you don't need a separate library for it.
3.1 PostgreSQL with pg
First, install the package:
npm install pgHere’s a complete, well-commented example of setting up a pool:
// db.js
const { Pool } = require('pg');

// Create ONE pool for your entire application.
// This should be created once and reused everywhere -
// never create a new Pool() per request!
const pool = new Pool({
  host: 'localhost',
  port: 5432,
  user: 'postgres',
  password: 'your_password',
  database: 'my_app_db',
  // --- Pooling-specific configuration ---
  max: 20,                     // Maximum number of clients in the pool
  min: 4,                      // Minimum number of clients kept alive
  idleTimeoutMillis: 30000,    // Close idle clients after 30 seconds
  connectionTimeoutMillis: 5000 // Error if a connection can't be acquired in 5s
});
// Optional but recommended: listen for unexpected errors
// on idle clients (e.g., network drop). Without this handler,
// your whole Node.js process could crash on an unhandled error.
pool.on('error', (err) => {
  console.error('Unexpected error on idle client', err);
});
module.exports = pool;
Now, using the pool inside your route handlers:
// userController.js
const pool = require('./db');

async function getUserById(req, res) {
  const { id } = req.params;
  try {
    // pool.query() automatically:
    // 1. Acquires a connection from the pool
    // 2. Runs the query
    // 3. Releases the connection back to the pool
    // This is the simplest and safest way to use the pool.
    const result = await pool.query(
      'SELECT id, name, email FROM users WHERE id = $1',
      [id]
    );
    if (result.rows.length === 0) {
      return res.status(404).json({ message: 'User not found' });
    }
    res.json(result.rows[0]);
  } catch (err) {
    console.error('Database query failed:', err);
    res.status(500).json({ message: 'Internal server error' });
  }
}
module.exports = { getUserById };
Why pool.query() Is Usually Enough
Notice we never manually called pool.connect() or released anything ourselves. That's because pool.query() is a convenience method that automatically acquires a client, runs the query, and releases the client back — even if the query throws an error. For 90% of use cases (a single query per request), this is exactly what you want.
When You Need Manual Acquire/Release: Transactions
Sometimes you need to run multiple queries as a single atomic transaction (for example, transferring money between two bank accounts — both the debit and credit must succeed together, or neither should happen). In this case, you must manually acquire a single client from the pool so all the queries run on the same underlying connection.
async function transferFunds(fromAccountId, toAccountId, amount) {
  // Manually acquire ONE client for the entire transaction.
  const client = await pool.connect();

try {
    // BEGIN starts the transaction on this specific connection
    await client.query('BEGIN');
    await client.query(
      'UPDATE accounts SET balance = balance - $1 WHERE id = $2',
      [amount, fromAccountId]
    );
    await client.query(
      'UPDATE accounts SET balance = balance + $1 WHERE id = $2',
      [amount, toAccountId]
    );
    // COMMIT makes the changes permanent
    await client.query('COMMIT');
  } catch (err) {
    // If ANYTHING fails, undo all changes made in this transaction
    await client.query('ROLLBACK');
    throw err;
  } finally {
    // CRITICAL: Always release the client back to the pool,
    // whether the transaction succeeded or failed.
    // Forgetting this line is one of the most common bugs
    // in Node.js + pg applications - it slowly "leaks"
    // connections until the pool is exhausted.
    client.release();
  }
}
This finally block is the single most important line to remember when working with connection pools. If you forget to release a connection, it stays marked as "in use" forever, even though nothing is actually using it. Do this enough times, and your entire pool becomes exhausted — every future request will hang waiting for a connection that will never come free. This is called a connection leak, and it's the #1 real-world bug related to pooling.
3.2 MySQL with mysql2
The concepts are identical for MySQL; only the syntax changes slightly.
npm install mysql2// db.js
const mysql = require('mysql2/promise');
const pool = mysql.createPool({
host: 'localhost',
user: 'root',
password: 'your_password',
database: 'my_app_db',
waitForConnections: true, // Queue requests instead of throwing immediately
connectionLimit: 20, // Equivalent to "max" in pg
maxIdle: 10, // Max idle connections kept open
idleTimeout: 60000, // Close idle connections after 60 seconds
queueLimit: 0 // 0 = unlimited queued requests
});
module.exports = pool;Using it in a route:
const pool = require('./db');

async function getUserById(req, res) {
  const { id } = req.params;
  try {
    const [rows] = await pool.query(
      'SELECT id, name, email FROM users WHERE id = ?',
      [id]
    );
    if (rows.length === 0) {
      return res.status(404).json({ message: 'User not found' });
    }
    res.json(rows[0]);
  } catch (err) {
    console.error('Database query failed:', err);
    res.status(500).json({ message: 'Internal server error' });
  }
}
And a transaction example with manual connection handling:
async function transferFunds(fromAccountId, toAccountId, amount) {
  const connection = await pool.getConnection();

try {
    await connection.beginTransaction();
    await connection.query(
      'UPDATE accounts SET balance = balance - ? WHERE id = ?',
      [amount, fromAccountId]
    );
    await connection.query(
      'UPDATE accounts SET balance = balance + ? WHERE id = ?',
      [amount, toAccountId]
    );
    await connection.commit();
  } catch (err) {
    await connection.rollback();
    throw err;
  } finally {
    connection.release(); // Return the connection to the pool
  }
}
Part 4: How Do You Choose the Right Pool Size?
This is one of the most common beginner questions, and the honest answer is: it depends, but there are solid guidelines.
Get Vasanthan K’s stories in your inbox
Join Medium for free to get updates from this writer.
A common mistake is assuming “bigger pool = better performance.” In reality, an oversized pool can hurt performance, because:
- Your database server has a finite amount of CPU and memory. Too many simultaneous connections cause context-switching overhead and resource contention on the database side, even if your Node.js app can technically request that many.
- Node.js itself is single-threaded for JavaScript execution. Even if you have 100 pooled connections, if your event loop can only meaningfully process a handful of concurrent operations efficiently, extra connections just sit idle or create contention.
A widely cited starting formula (originally from HikariCP’s documentation, but broadly applicable) is:
connections = (number_of_cpu_cores * 2) + effective_spindle_countFor most cloud-hosted applications with SSD-backed databases, a simpler practical rule of thumb is:
pool max size ≈ 10-20 per application instance (for small/medium apps)And remember: if you run multiple instances of your Node.js app (e.g., 5 instances behind a load balancer), your total connections to the database is pool_size × number_of_instances. This is a very common gotcha — teams increase their pool size per instance without realizing the database now needs to handle far more total connections than before.
3 Node.js Instances, each with pool max = 20
 ────────────────────────────────────────────
 Instance 1 → 20 connections  ─┐
 Instance 2 → 20 connections  ─┼──> Database must support 60 total!
 Instance 3 → 20 connections  ─┘
If your database’s max connection limit is 100, and you scale to 6 instances at 20 each, you’ve already hit the ceiling — before accounting for admin tools, migrations, or monitoring connections.
Part 5: Common Mistakes to Avoid
- Creating a new Pool per request. The pool should be created once when your application starts, and reused for the entire lifetime of the app. Creating a
new Pool()inside a route handler defeats the entire purpose of pooling. - Forgetting to release manually-acquired clients. As shown above, always use
try/finallyto guaranteeclient.release()runs, even on error. - Not handling pool-level errors. An idle connection can be dropped by the database or network at any time. Without a
pool.on('error', ...)handler inpg, an unhandled error can crash your entire Node.js process. - Setting
maxtoo high "just in case." This often causes more harm than good — it can overwhelm the database rather than help your app scale. - Not closing the pool during graceful shutdown. When your app shuts down (e.g., on deployment or restart), you should explicitly close the pool so connections aren’t left dangling:
process.on('SIGTERM', async () => {
  console.log('Shutting down gracefully...');
  await pool.end(); // Waits for active queries to finish, then closes all connections
  process.exit(0);
});
Part 6: Monitoring Your Pool
Both pg and mysql2 expose properties so you can monitor pool health in real time — extremely useful for debugging performance issues or connection leaks.
With pg:
setInterval(() => {
  console.log({
    totalCount: pool.totalCount,   // Total clients (idle + in use)
    idleCount: pool.idleCount,     // Currently idle clients
    waitingCount: pool.waitingCount // Requests waiting for a free client
  });
}, 5000);
If waitingCount is consistently greater than zero, it's a strong signal that your pool is too small for your current traffic, or that you have a connection leak somewhere causing connections to never be released.
Summary
Let’s tie everything together:
- Opening a raw database connection is expensive: it involves a TCP handshake, authentication, and server-side session allocation — often taking far longer than the query itself.
- Connection pooling solves this by keeping a set of pre-established, reusable connections ready to go, dramatically reducing per-request overhead.
- In Node.js, both
pg(PostgreSQL) andmysql2(MySQL) come with built-in pooling — you don't need extra libraries. - Use
pool.query()for simple, single-statement operations; manually acquire and release a client (withtry/finally) for multi-statement transactions. - Size your pool thoughtfully based on your database’s actual connection limits and your number of running app instances — bigger is not always better.
- Always monitor your pool’s
idleCountandwaitingCountin production to catch leaks or undersized pools early.
Connection pooling is a small piece of configuration that has an outsized impact on your application’s stability and performance under load. Once you understand the mechanics — what a connection actually costs, and how a pool amortizes that cost across many requests — the configuration options stop feeling like magic numbers and start making intuitive sense.